Navigatr offers two ways to create badges: using the AI Badge Assistant (recommended) or creating a badge from scratch.
Option 1: Create a Badge Using AI Badge Assistant
Navigatr’s AI Badge Assistant helps you quickly create badges with professional visuals tailored to your needs. The assistant also provides personalised suggestions based on your provider’s use case to guide you in badge creation.

- Log In and go to Content > Badges (or press the + button and select Badge).
- Choose "NEW" and select Using AI Badge Assistant.
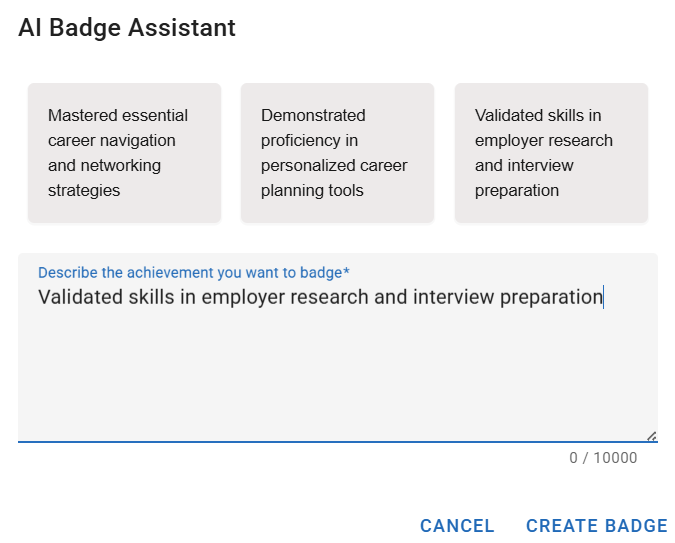
- Review Suggestions: At the top of the screen, you’ll see suggested badge descriptions relevant to your use case. These can help you quickly generate badges that align with your goals. If a suggestion matches what you need, click it to use as your badge description.
- Describe the Achievement: If none of the suggestions match, enter a description of the achievement you want to badge in 5–10,000 characters. Specify levels and whether to use professional or academic language.
- Press "CREATE BADGE": You’ll be redirected to review your badge’s information and automatically generated image.
- Edit the badge details if necessary:
- Visual Elements: Adjust the Learning Type, Mode, Title, Subtitle, Logo, and Colours to match your brand. Learn how to design stunning badge image with the Badge Artist. You can also upload a custom badge image.
- Save or Publish: When ready, click SAVE to keep as a draft or PUBLISH to make it discoverable.
If you need further assistance, please contact support@navigatr.app.
Option 2: Create a Badge from Scratch
If you prefer to create a badge manually, follow these steps:
- Log In and navigate to Content > Badges (or press the + button and select Badge).
- Create New Badge: Click NEW and select From Scratch.
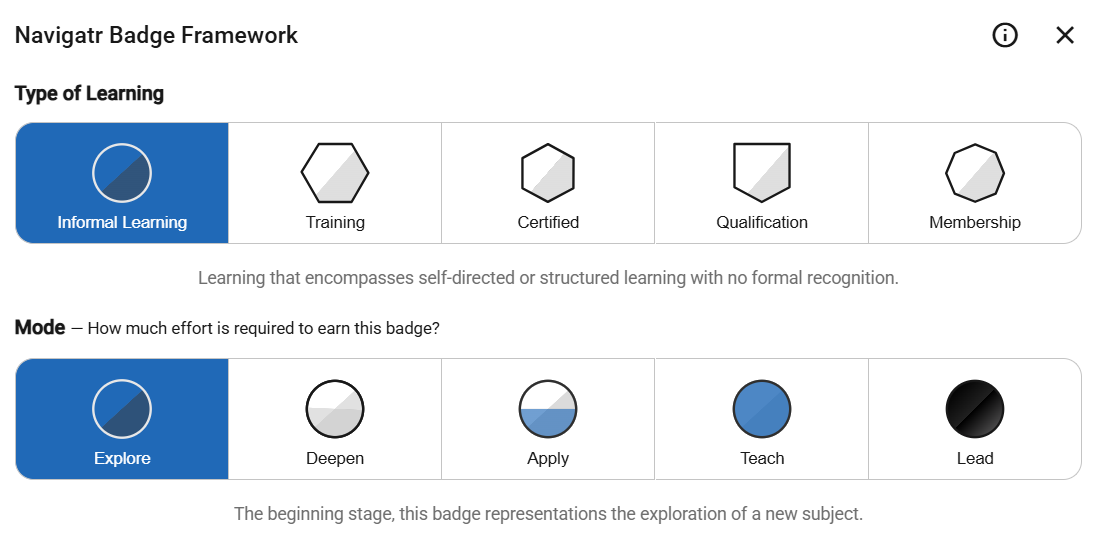
- Standards: Align your badge to the Navigatr Badge Framework.
- Type of Learning: Select which type of learning the badge represents. Hover over each type for more information.
- Mode: How much effort is required to earn the badge? Hover over each mode for more information.

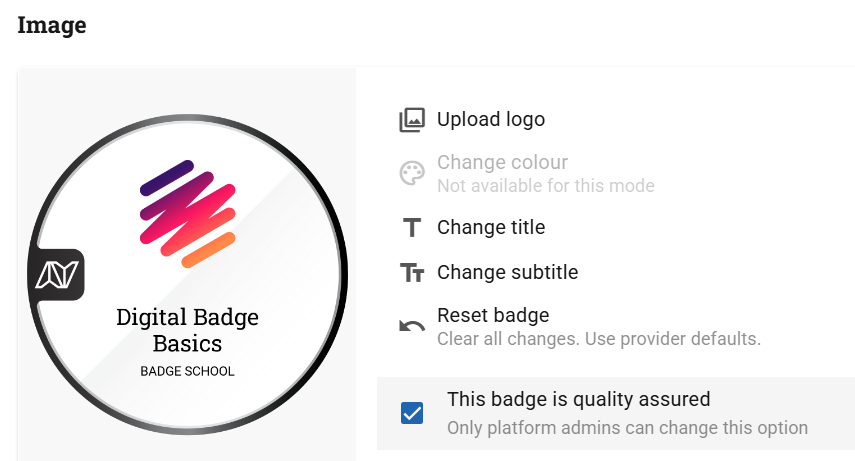
- Image: Your badge image will be automatically generated based on its alignment to the Navigatr Badge Framework and your provider's default branding, if you've previously configured this. If your badge is not aligned with the Navigatr Badge Framework, click Remove Navigatr Standard. You will then be able to upload a custom image.
Learn how to design stunning badge images with the Badge Artist.- Upload Logo: Upload your organisation's logo that will appear on your badge.
- Change colour: Change the primary colour of your badge. This only applies to certain modes.
- Change title: Optional. Change the title that appears on the badge. By default, the badge's name will appear here.
- Change subtitle: Optional. Add a subtitle to appear on the badge image.
- Reset badge: Reverts all changes made to the badge's image to the provider defaults.

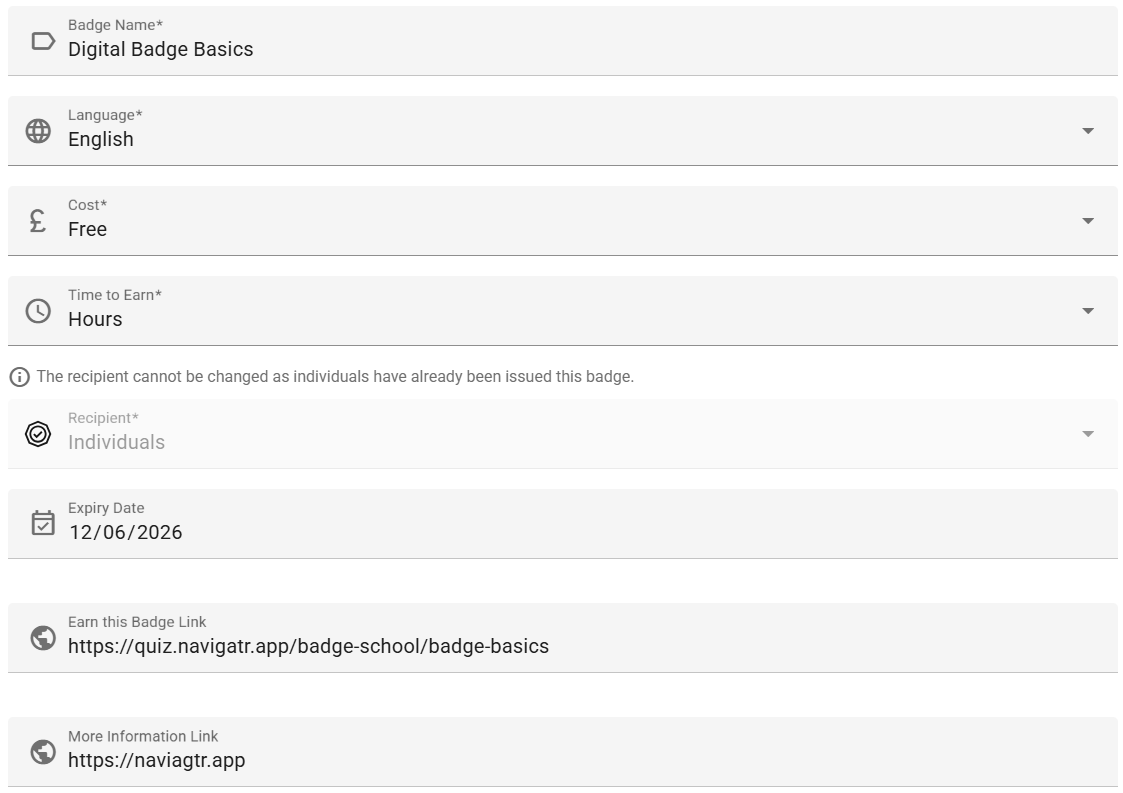
- Enter Badge Details:
- Badge Name: Enter a name for the badge.
- Cost: Is the badge free or is there a cost?
- Time to Earn: How long does it take to earn the badge?
- More Information Link: Optional. Add an additional link for more details.
- Recipient: Is the badge available to Individuals or Organisations?
- Expiry Date: Optional. Users will not be able to earn this badge after this date.
- Earn this Badge Link: Optional. This link will appear as an Earn Badge button on the badge's page.

- Availability:
- Choose Everyone if the badge is open to all.
- Select Restricted if there are access limitations.
- Location:
- Choose In person, Online, or Both.
- Address: Enter the full address for in-person activities, which will help the platform interpret the location for attendees.
- Description: Provide a brief description of the badge. This field supports up to 3,000 characters and should describe the purpose or content of the badge.

- Criteria: Add a list of criteria that must be satisfied in order to earn the badge.
- Type: Choose the type of the criteria.
- Criteria: Provide a brief description of the criteria. This field supports up to 500 characters.
- More Information Link: Optional. Add an additional link for more details.

- Skills: Add relevant skills that earners will demonstrate by earning this badge. Click Add a skill or Suggest to select skills that make the badge more discoverable.

- Endorsements: Add any organisations or entities that endorse this badge.
- Name of Endorser
- About this Endorser: Provide a brief description of the endorser. This field supports up to 500 characters.
- More Information Link: Optional. Add an additional link for more details.
- Image: Optional. Upload the logo of the endorser. Accepted formats include PNG, JPG, JPEG, and WEBP, with a recommended size of 300x300.

- Save and Publish: Review your badge and either SAVE as a draft or PUBLISH to make it accessible to the intended audience.
For further help with creating a badge from scratch, reach out to support@navigatr.app.
Next Steps
- Learn how to make your badges better by reading through our article on How to Quality Assure a Badge
- New to Navigatr? Follow this pathway to learn all the basics of the platform and earn a few badges along the way.

Was this article helpful?
That’s Great!
Thank you for your feedback
Sorry! We couldn't be helpful
Thank you for your feedback
Feedback sent
We appreciate your effort and will try to fix the article